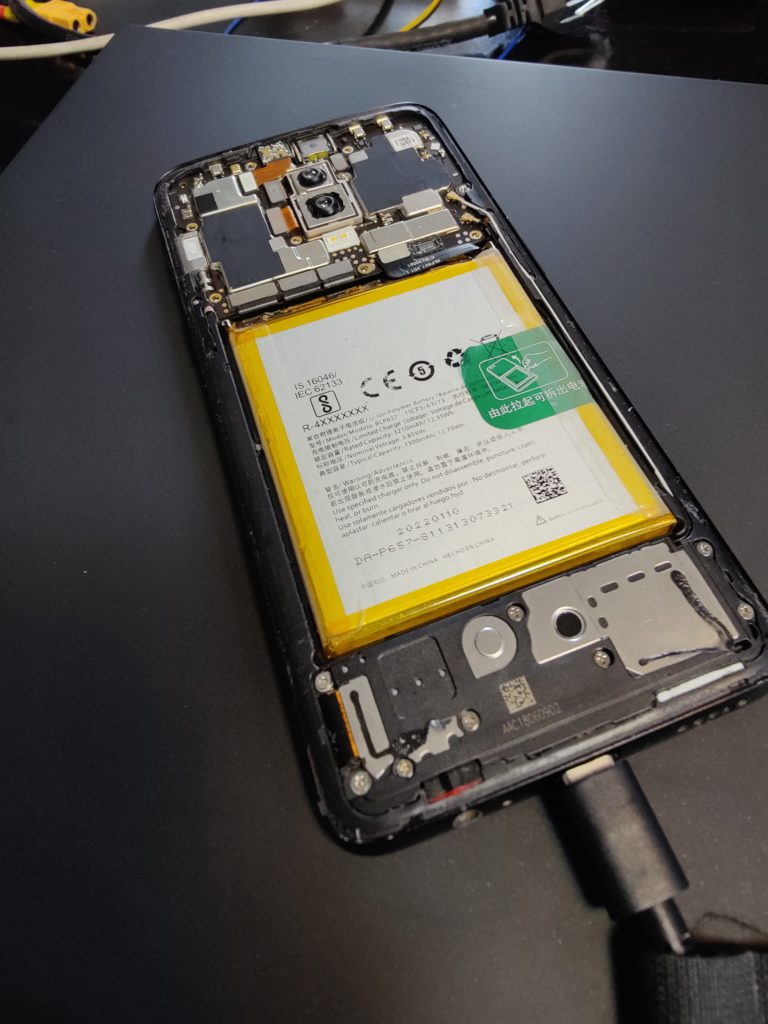
I bought an Android phone in 2018. When it was new, i used to charge it every other day. After 5 years of daily usage, now the battery lasts around 3-4 hours. I felt bad throwing it to the recycling box. I knew that the issue would be fixed with a battery replacement. So I bought a new battery from IFIXIT and also needed to buy glue for the back pane from Aliexpress. After that I watched some YouTube videos on how to replace the battery, sadly modern phones have glued back panes and require heating to remove the backlid.
After some YouTube videos and probing with a guitar pick we managed to get it open and replaced the battery. The phone now lasts one day without charging. I believe the years of software upgrades and apps made it more power hungry.
Due to this little operation, I realized many things in life are transient, and consumable? Nothing is forever? The device might be working now, but it already stopped getting software upgrades, even though it lives, the tempo of life left it behind.
Here is a tutorial on how to virtualize OPNSense on a Proxmox Hypervisor <3.
I decided to move away from a consumer router to an enterprisey router like OPNSense. The best way to get experience on a technology stack is to use it on production.
Potential Benefits
Play with Intrusion detection/prevention systems
More custom DHCP settings (per lease level dns, gateway)
WAN Load balancing
IPV6 NAT
Scriptability
Firewall Logs (You can see a lot)
Unified experience on different hardware. I’m not bound to a specific manufacturer to buy routers (for my level of networking, if you go datacenter level its a different story)
Steps
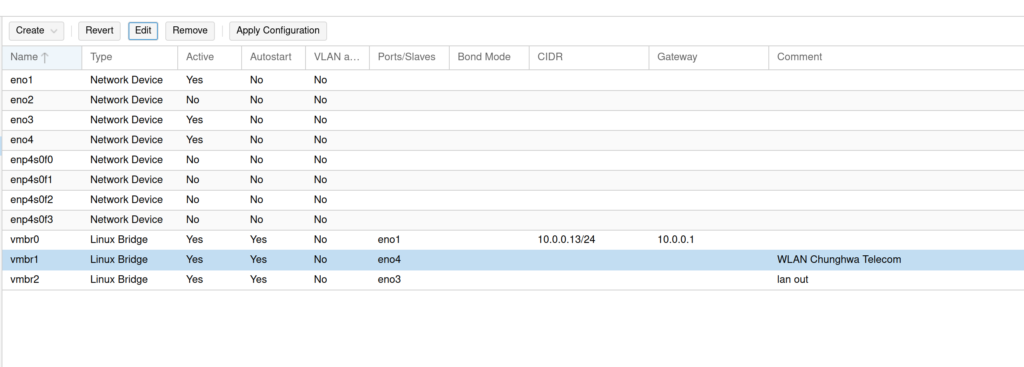
My host used for this tutorial has 4 ethernet ports. I wired them as following:
eno1 – default Proxmox Lan port eno2 – empty eno3 – LAN for OPNSense eno4 – WAN for OPNSense
and I have 3 linux bridges:
vmbr0 — eno1 has CIDR for proxmox host IP address + gateway (LAN) vmbr1 — eno4 (WLAN) vmbr2 — eno3 (LAN)
Here is a screen shot as well:
My OPNSense VM has two network devices
net0 bridged to vmbr1 (WLAN) net1 bridged to vmbr2 (LAN)
from here the configuration is pretty straight forward.
1) Manually choose LAN/WAN interfaces in terminal while doing the setup, auto discover failed for me.
2) Make sure that your DNS settings are the way you want them to be! I had to tweak some settings in the unbound DNS service page (forward DNS requests)
3) As with every new router, get a new lease from a client and check the results. My old router had hardcoded dns settings in DHCP leases. Consumer grade routers don’t really care if you want custom DNS or not.
I initially set this up in my test cluster, my main fear was wifi wouldn’t work as the way I want it to work, but it didn’t happen to be the case. You need to switch your access point into “AP Mode” to work with OPNSense router. In that configuration access point lets the clients connected to itself get DHCP lease from the OPNSense. The access point also has a LAN IP address where you can configure it’s security settings (Wifi password etc)
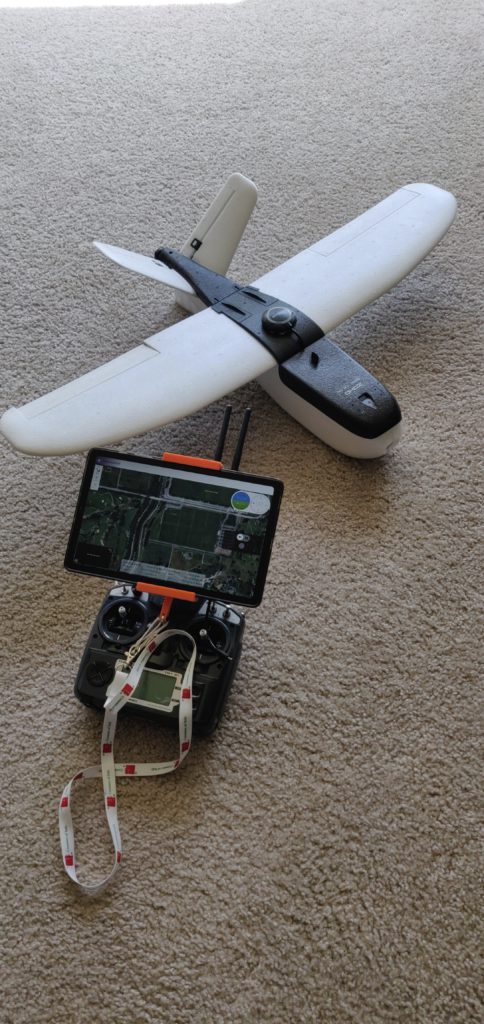
I built a FPV plane using Ardupilot, DJI FPV system and OpenTX. It can:
Auto Take-off, Navigate Waypoints, Come back home, other autonomous stuff, stream 720p 30ms, record 1080p video.
Its pretty fun to fly. My take off weight is around 686g. I get 15 minutes of flight time with a very old 2200 battery, I need to test with a healthy battery (I’m building a lithium ion pack for it)
Zohd Nano Talon (bought from Amazon long ago..) 150$
2200 mAh LiPO 30$
DJI Fpv system (Caddyx Air Unit + DJI FPV Goggles V2) 500$
Android Tablet /w QGround Control 329$
Wifi Access Point 30$
Esp8266 (telemetry) 1$
How To Build
Well, first you need to read all ardupilot wiki. I used ardupilot for more than 10 years now, since it was APM2.6 with gps module soldered in to the autopilot. It came a long way since then. Here are the steps that I followed:
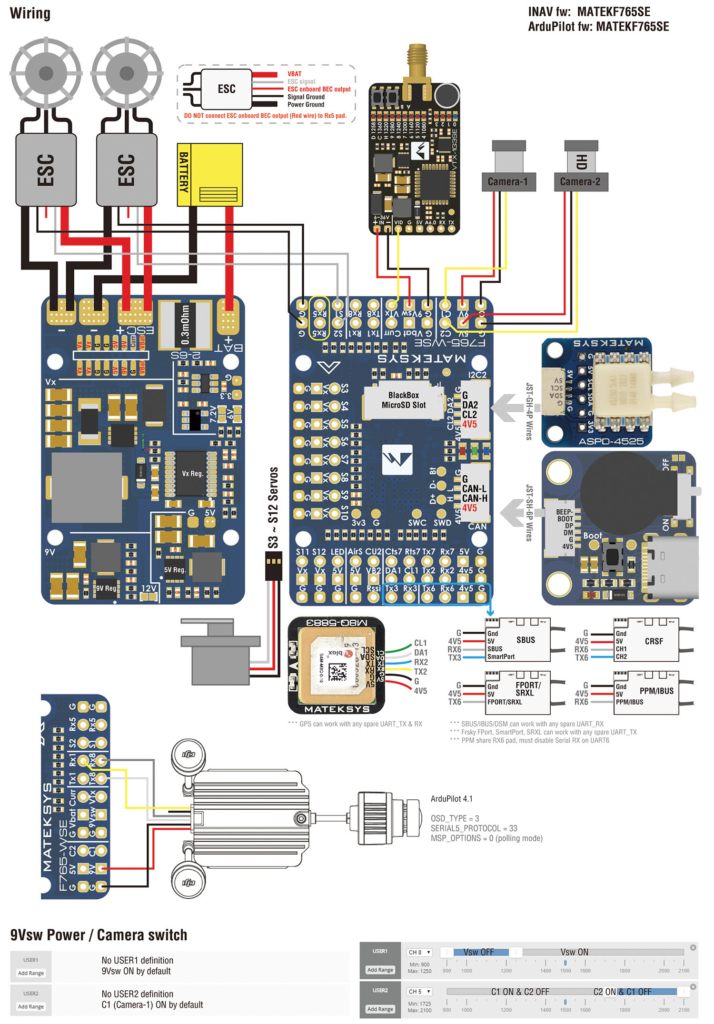
Solder the pins of the autopilot, I had to use flux to solder.
Ideally cut your cables to desired length, it can get messy quick inside the plane.
Before connecting anything, flash your Mateksys board. You need to install something called Zadig to make the drivers work in Windows. After that you need Inav Configurator (I used 4.1). Start the board while holding boot button. Load local firmware. I downloaded the firmware from this url (bl one). Verify your installation works by connecting the board to mission planner and play with it.
Connect the GPS (I used TX2,RX2 as it was indicated in Mateksys diagram). It should work out of the box.
Wire the controls: I used S3, S4, S5, S6 instead of the default configuration listed in Mateksys website. You need to change the settings for the pins in configuration (TODO add what to do here) I directly wired ESC bec to servo rails, Vx, nothing fried.
Mount everything cleanly inside the plane!
Flash the ESP8266 with pixracer firmware. Make sure that you pull the repository with
because it has other repositories linked with it, if you don’t you wont be able to compile! You need platformio to compile and flash the project. Also a esp01 flasher with boot button. The unit will not work while connected to the esp01 flasher, after flashing it, remove it from the flasher and wire it to the autopilot as following: tx1, rx1 –> esp8266, you need a 5v to 3.3v voltage shifter as well!
(TODO add the settings for the SERIAL_configuration)
after all of this, you should be able to see a wifi access point called pixracer, connect to that and configure it as you wish.
I discovered that AP has very very poor range outside with a tablet. I set up an access point, ESP8266 connects to the access point, and my tablet connects to access point. That way I can get a good bit of line of sight range.
After making sure that you have WIRELESS TELEMETRY, setup the accelorometer, compass, radio.
This part is very important, i didn’t do this properly and it lead to a crash. Switch to manual, put your plane on a bench where it is flat. Look at the control surfaces in the default positions. They should all be flat at manual mode. Adjust the trims accordingly from servo output screen in mission planner.
Yes ardupilot will correct the surfaces in stabilized mode according to your gyroscope, but it takes time for it to do that. When you hand launch you have 1-2 seconds to gain enough speed to start flying. If the autopilot is using those 1-2 seconds correcting its attitude rather than just accelerate, you might fail the take off.
Also make sure that travels of the servos are equal in both directions, you can also adjust your servo arms manually for this as well.
This part is very important too! Switch to FWBA and tilt/roll the plane. See how the control surfaces react. Roll & Elevator will reach, yaw won’t do anything.
Now command from your controller to see how do control surfaces react, I would do this in manual, fix the controlls as neccessary, you might need to reverse channels. (I assume you already calibrated your radio…)
Now it is time for more configuration! Failsafes, make sure that your throttle failsafe is rock solid and it works. This will save you big time. No failsafe no flight. Also set your battery failsafe.
Adjust your flightmodes as neccessary. If you don’t want to auto take off, you should use FWBA it is an autopilot assisted flight mode, doesn’t use gps, its like stabilize but with limits.
How to Setup DJI FPV
DJI fpv offers a whole package for the video transmission. Pros: Works, Low Latency, Long Range Cons: Restricted (can’t configure OSD very much), Need the goggles, a little expensive.